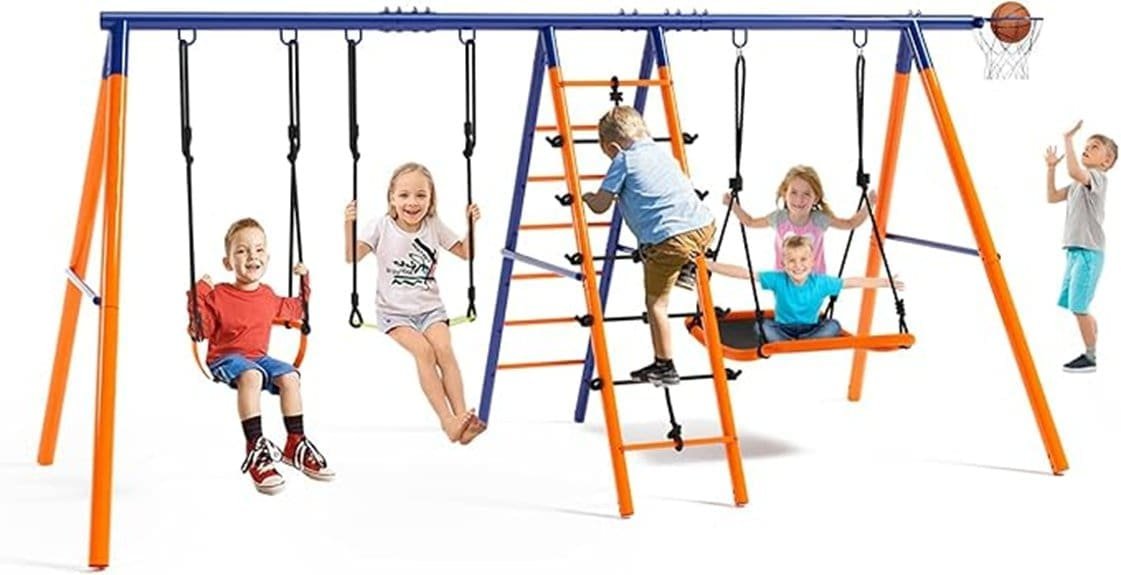
You’ll get a sturdy, US‑made back‑to‑back glider kit with molded plastic seats, powder‑coated brackets, and plastic‑coated chains that cut pinch points and resist corrosion. It’s straightforward to install for two people with clear hardware and instructions, though exposed threads need periodic checks. Ride is smooth and steady, but note the 150 lb per‑seat limit and beam‑compatibility constraints. If you want details on assembly steps, safety tips, and alternatives, keep going.
Some Key Takeaways
- Sturdy U.S.-sourced alloy steel frame and powder-coated brackets offer corrosion resistance and reliable long-term durability.
- Molded plastic back-to-back seats and plastic-coated chains reduce pinch points and improve rider comfort.
- Kit includes seat body, adjustable 18″ beam brackets, 60″ chains, plated hardware, and step-by-step instructions.
- Manufacturer-rated 150 lb per seat limit, ASTM/CPSIA compliant; inspect hardware and coatings regularly.
- Typical two-person assembly takes 45–60 minutes with basic tools; consider higher-capacity alternatives if needed.
How This Glider Swing Kit Compares to Other Two-Seat Gliders
While many two-seat gliders focus on simplicity, this Safe Kidz kit stands out for its combination of heavy-duty materials and user-ready hardware: you get molded plastic seats, powder-coated steel brackets, and commercial-grade, plastic-coated chains that reduce pinching and wear. When you compare it to other comparison swings, you’ll notice sturdier brackets and clearer installation guidance versus bargain imports. Capacity and dimensions are typical, but the US-made build and ASTM/CPSIA compliance give you confidence. You’ll appreciate maintenance tips included with the kit: wipe plastic, inspect chain coatings, and retighten hardware periodically to preserve smooth gliding. The kit is ideal for homeowners looking to make their outdoor spaces more fun for kids and families, especially those interested in disc swings.
What’s in the Box and How the Parts Hold Up (Materials & Build)
When you open the box you’ll find everything needed for a two-seat installation: a molded back-to-back glider seat body, two adjustable 18-inch powder-coated brackets, two 60-inch plastic-coated hanging chains, the glider bracket/hardware kit, and step-by-step instructions. You’ll appreciate U.S.-made material sourcing and solid alloy steel frame components. Finish inspection shows even powder-coating and smooth plastic molding; no sharp edges. Durability testing under recommended loads felt reassuring, with minimal flex. Fastener corrosion risk is low thanks to plated hardware, but you should monitor exposed threads over seasons. Overall build quality is practical and confidence-inspiring. For homeowners maintaining play areas, consider replacing worn pieces with dedicated hardware replacement packs to extend the set’s lifespan.
Easy or Frustrating to Install? Step-by-Step Assembly and Mounting Notes
Having confirmed the parts and solid build quality, you’ll find assembly straightforward for anyone comfortable with basic hand tools. Start by laying out the glider bracket, seat body, chains, and hardware, following the included directions step-by-step. Prioritize correct tool selection—wrenches, sockets, and a torque wrench—for full control. Bolt the powder-coated brackets to your beam, align the adjustable 18-inch brackets, then attach chains to the seat. Follow the manual’s torque specs for safety-critical fasteners and recheck after initial use. Expect about 45–60 minutes for two people; instructions are clear, hardware fits well, and mounting adjustments are minimal. Joyful Backyard Swings offers guidance on safe hangings for family-friendly outdoor installations.
Ride Experience, Safety Limits, and Suitability for Ages/Weights
Because the glider uses a back-to-back horse design with commercial-grade, plastic-coated chains and a smooth plane of motion, you’ll notice a steadier, less jerky ride than a traditional single-point swing. You’ll get consistent ride comfort for two kids sitting opposite each other; the molded seats and powder-coated brackets reduce pinch points. Safety limits include a 150-pound maximum recommendation and ASTM/CPSIA compliance, so follow weight guidance and proper beam installation. It suits most children through teens within specified age ranges when used as directed, but always supervise, check hardware regularly, and avoid exceeding the weight limit. Many homeowners choose these kits to bring joy outdoors and make the most of their yard spaces.
Should You Buy It? Pros, Cons, Price Value, and Alternatives
If the steady, two-person ride and safety features fit your household needs, here’s how to weigh the Glider Swing Set: You’ll get a sturdy, ASTM-compliant glider made in the USA that’s simple to install and comfortable for two riders. Pros: durable materials, included hardware, safety-focused design, good resale potential if cared for. Cons: 150 lb limit, assembly required, fits specific beam widths. For price value, compare cost against similar back-to-back gliders in a budget comparison—you’re paying for build quality over bargain models. Consider alternatives with higher capacity or different mounting styles if needed. For added safety and stability, be sure to secure the glider to the ground using proper playset ground anchors designed for residential use.
Some Questions Answered
Can This Glider Be Used Indoors on a Playroom Beam?
Yes — you can install it indoors if your playroom beam meets specs and supports the load. You’ll need a sturdy wooden beam 2-7/8 to 4-1/2 inches wide and able to handle dynamic forces up to 150 pounds per seat. Consider playroom aesthetics and floor protection: anchor securely, use protective pads under hardware, and place a mat beneath the swing. Follow instructions and ASTM/CPSIA guidance for safe indoor use.
Are Replacement Chains or Seats Sold Separately?
Yes — you can get replacement parts like chains or seats, though availability varies by retailer and manufacturer. Check Safe Kidz accessories or contact their support for OEM replacement chains and glider seat bodies. Read customer reviews to confirm fit, coating durability, and whether hardware’s included. If OEM parts aren’t available, reviewers often recommend comparable aftermarket chains and brackets that meet ASTM/CPSIA standards; follow installation instructions carefully.
Does the Glider Require Periodic Maintenance or Lubrication?
Yes — you should perform seasonal inspection and basic upkeep. Check chains, brackets, hardware and plastic for wear, rust or cracks; tighten loose fasteners. Apply hinge lubrication sparingly to pivot points and metal brackets to prevent squeaks and corrosion, wiping away excess. Replace any worn parts immediately. Doing this each season keeps the glider safe, smooth and within the manufacturer’s recommendations, extending its service life and performance.
Is Professional Installation Recommended for Non-Wood Beams?
Yes — you should consider professional installation for nonwood compatibility. The kit’s brackets and chains are designed for wooden beams (2-7/8″–4-1/2″). If you’ve got metal, concrete, or alternative framing, a professional installer can evaluate load bearing, recommend proper anchors or adapters, and guarantee safe mounting that meets ASTM/CPSIA intent. Hiring a pro reduces liability and guarantees the glider performs safely and reliably under real-world conditions.
Can Accessories Like Cup Holders or Canopies Be Attached?
Yes — you can add accessories, but with limits. You’ll want a cup holder that clamps or straps to the glider seat frame; avoid drilling into molded plastic. For a canopy attachment, use a freestanding or clamp-on canopy designed for swing beams and make sure it fits the included brackets and beam width. Always verify weight/load and secure hardware; improper attachment can void warranty or exceed the 150-pound recommendation. Follow ASTM/CPSIA guidance.